
Funix - The laziest way to build GUI apps in Python
Abstract
The rise of machine learning (ML) and artificial intelligence (AI), especially the generative AI (GenAI), has increased the need for wrapping models or algorithms into GUI apps. For example, a large language model (LLM) can be accessed through a string-to-string GUI app with a textbox as the primary input.
Most of existing solutions require developers to manually create widgets and link them to arguments/returns of a function individually. This low-level process is laborious and usually intrusive. Funix automatically selects widgets based on the types of the arguments and returns of a function according to the type-to-widget mapping defined in a theme, e.g., bool to a checkbox. Consequently, an existing Python function can be turned into a GUI app without any code changes. As a transcompiler, Funix allows type-to-widget mappings to be defined between any Python type and any React component and its props, liberating Python developers to the frontend world without needing to know JavaScript/TypeScript. Funix further leverages features in Python or its ecosystem for building apps in a more Pythonic, intuitive, and effortless manner. With Funix, a developer can make it (a functional app) before they (competitors) fake it (in Figma or on a napkin).
1Introduction
Presenting a model or algorithm as a GUI application is a common need in the scientific and engineering community. For example, a large language model (LLM) is not accessible to the general public until it is wrapped with a chat interface, consisting of a text input and a text output. Since most scientists and engineers are not familiar with frontend development, which is JavaScript/TypeScript-centric, there have been many solutions based on Python, one of the most popular programming languages in scientific computing, especially AI. Examples include ipywidgets, Streamlit, Gradio, Reflex, Dash, and PyWebIO. Most of these solutions follow the conventional GUI programming philosophy, requiring developers to manually select widgets from a widget library and associate them with the arguments and returns of an underlying function, commonly referred to as the “callback function.”
This approach has several drawbacks.
First, it is manual and repetitive. A developer needs to manually create widgets, align them with the signature of the callback function, and maintain the alignment manually should any of the two changes.
Second, the choice of widgets is limited to those provided by a specific GUI library, as expanding the widget library requires significant knowledge and effort that the target users are unlikely to possess.
Third, these solutions do not leverage the features of the Python language itself to automate or streamline the process. For example, most existing solutions require developers to manually specify the labels of widgets, even though such information is often already available in the Parameters or Args sections of a function’s Docstrings, which are common in Python development.
As a result, scientific developers, such as geophysicists, neurobiologists, or machine learning engineers, whose jobs are not building apps, are not able to quickly fire up apps to present their models, algorithms, or discoveries to the world.
To address these drawbacks, Funix was created to automatically launch apps from existing Python functions. We observed that the choice of a widget is correlated with the type of the function’s input/output that it is associated with. For example, a checkbox is only suitable for Boolean types. Funix automatically selects widgets based on the types of the function’s arguments and returns. In the default theme of Funix, Python native types such as str, bool, and Literal are mapped to an input box, a checkbox, and a set of radio buttons in the MUI library, respectively. Common scientific types like pandas.DataFrame and matplotlib.figure.Figure are mapped to tables (MUI’s DataGrid) and charts (in mpld3). A variable’s type can be specified via type-hinting, which is a common practice in Python development, or inferred, which Funix plans to support in the future.
1 2 3# hello.py def hello(your_name: str) -> str: return f"Hello, {your_name}."
Program 1:A hello, world! example in Funix. It is an ordinary Python function with nothing special to Funix. The corresponding GUI app is shown in Figure 1.

Figure 1:The app generated from Program 1 by the command funix hello.py via Funix. Funix can be installed as simple as pip install funix.
1 2 3 4 5 6 7 8 9 10 11 12# hello.py import typing # Python native import ipywidgets # popular UI library def input_widgets_basic( prompt: str = "Who is Oppenheimer?", advanced_features: bool = True, model: typing.Literal['GPT-3.5', 'GPT-4.0', 'Falcon-7B'] = 'GPT-4.0', max_token: range(100, 200, 20) = 140, openai_key: ipywidgets.Password = "1234556", ) -> str: pass
Program 2:An advanced input widgets example in Funix. The input panel of the corresponding GUI app is shown in Figure 2. In this example, Funix not only uses Python native types but also types from ipywidgets, a popular UI library in Jupyter.
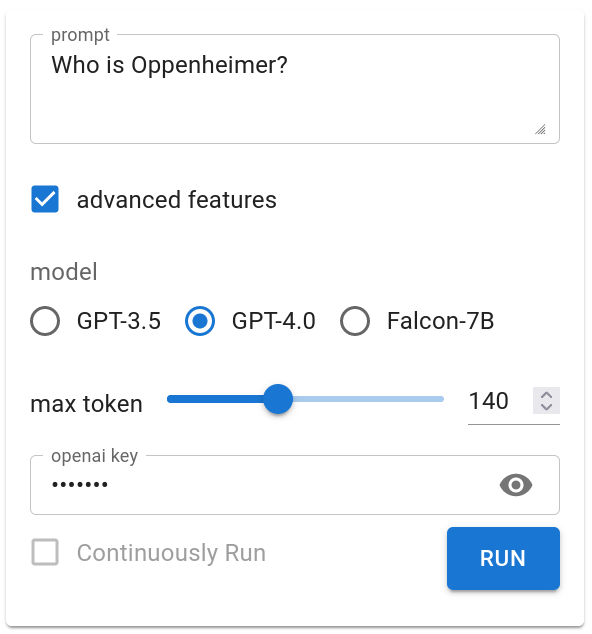
Figure 2:The input panel of the app generated from Program 2 by Funix, showing a variety of input widgets.
Unlike many of its peers, Funix does not have its own widget library.
Any React component can be bound to a Python type.
A type-to-widget mapping can be redefined or created [on-the-fly](#Supporting a new type on the fly using the new funix type decorator) or via a reusable [theme](#Defining and using themes).
Additionally, the properties (i.e., props) of the frontend widget can be configured in Python via JSON.
In this sense, Python becomes a surface language for web development.
The frontend development world, dominated by JavaScript/TypeScript, is now accessible to Python developers who previously couldn’t tap into it.
The centralized management of appearances using themes is an advantage of Funix over many of its peers. A theme allows for the automatic launching of apps and ensures consistent GUI appearances across different apps. To change the appearance of an app, simply select a different theme. For further customization, a theme can be extended using the popular JSON format. Often, a Funix developer can leverage themes developed by others to support new types or widgets, similar to how most scientists use LaTeX classes or macros created by others to properly typeset their papers.
More than a GUI generator, Funix is a transcompiler -- a program that translates source code from one language to another -- which generates both the backend and frontend of an application. Funix wraps the Python function into a Flask app for the backend and generates React code for the frontend. The two ends communicate via WebSocket.
In addition to types, Funix leverages other features of the Python language and ecosystem to further automate app building. Docstrings, commonly used in Python, are utilized by Funix to control the UI appearance. For example, the annotation of an argument in the Args (Google-style) or Parameters (Numpy-style) section of a docstring is used as the label or tooltip to explain the argument to the app user.
Funix also assigns new meanings to certain keywords and types in Python within the context of app building. For instance, global is used for states and sessions, yield for streaming, and each class becomes a multi-page app where pages share data via the self variable. These concepts are detailed in Section Building apps Pythonically.
In summary, Funix has the following cool features for effortless app building in Python:
- Automatic, type-based GUI generation controlled by themes
- Exposing any React component to Python developers
- Leveraging Python’s native features to make app building more intuitive, minimizing the need to learn new concepts specific to Funix.
2Motivation: the demand to rapidly launch low-interactivity and plain-looking apps at scale
When it comes to GUI app development, there is a trade-off between simplicity and versatility. JavaScript/TypeScript-based web frontend frameworks like React, Angular, and Vue.js offer great versatility. However, their versatility is often beyond the reach of most scientists and engineers, except for frontend or full-stack developers, and is usually overkill for most scientific and engineering applications.
As machine learning researchers, we have observed that a significant number of scientific applications share two common features:
- The underlying logic is a straightforward input-output process -- thus complex interactivity, such as dynamically updating an input widget based on user input in another input widget, is not needed.
- The app itself is not the end goal but a means to it -- thus it is not worthy to spend time on building the app.
Existing Python-based solutions such as Streamlit or Gradio do a great job addressing the first feature but are still too complicated for the second one, requiring developers to read their documentation and add code before an app can be launched. In particular, a developer needs to manually select and configure widgets and/or link them to the arguments and returns of a function. This low-level process is laborious. Since versatility is already sacrificed for simplicity in Python-based app building, why not trade it further for even more simplicity?
Funix pushes simplicity to the extreme. In the hello, world example above, an app is launched without requiring any learning or code modification. To achieve this simplicity, Funix leverages common Python development practices, such as type hints (or type inference) and docstrings, to save developers from extra work or learning. Funix does not aim to become a Domain Specific Language (DSL), because it treats the Python programming language itself (including the typing hint syntax and docstring styles) as a surface language for GUI app building.
Because Funix is designed for quickly firing up apps that model straightforward input-output processes, a Funix-generated app consists of two panels: the arguments of the underlying function on the left, input panel and the returns and printouts on the right, output panel (Program 1 and Figure 1). A more complex process can be decomposed into simple input-output processes and embodied into multi-page apps. The underlying or callback function will be called after the user plugs in the arguments and click the “Run” button. The result will be displayed in the output panel.
We would also like to argue that the rise of Generative AI (GenAI) is simplifying GUIs, as natural languages are becoming a prominent interface between humans and computers. For example, a text-to-image generation app (Figure 3) only needs a string input and an image output. In this sense, Funix and its Python-based peers will be able to meet many needs, both in scientific computing and more general applications, in the future.
1 2 3 4 5 6 7 8import openai # pip install openai import IPython def dalle(Prompt: str = "a flying cat on a jet plane") -> IPython.display.Image: client = openai.OpenAI() # defaults to os.environ.get("OPENAI_API_KEY") response = client.images.generate(Prompt) return response.data[0].url
Program 3:Source code for the Dall-E app in Funix. The corresponding GUI app is shown in Figure 3.

Figure 3:A Dall-E app generated by Funix by simply wrapping OpenAI’s image generation API with a str-to-Image function. Source code in Program 3.
3Funix’s default mapping from Python types to React components
Like CSS, Funix controls the GUI appearance based on the types. Under the hood, Funix transcompiles the signature of a function into React code. Currently, Funix depends on the type hint for every argument or return of a function. In the future, it will support type inference or tracing.
The default mapping from basic Python types to React components is given in Table 1. In particular, we leverage the semantics of Literal and List[Literal] for single-choice and multiple-choice selections. Two apps exhibiting the diversity of widgets are shown in Figure 2 and Figure 9.
Table 1:Default mapping from basic Python types to components.
| Python type | As an input (argument) or output (return) | Widget |
|---|---|---|
str | Input | MUI TextField |
bool | Input | MUI Checkbox or Switch |
int | Input | MUI TextField |
float | Input | MUI TextField or Slider |
Literal | Input | MUI RadioGroup if number of elements is below 8; Select otherwise |
range | Input | MUI Slider |
List[Literal] | Input | An array of MUI Checkboxes if the number of elements is below 8; AutoComplete otherwise |
str | Output | Plain text |
bool | Output | Plain text |
int | Output | Plain text |
float | Output | Plain text |
Because Funix is a transcompiler, it leverages multimedia types already defined in popular Python libraries such as ipywidgets (Jupyter’s input widgets), IPython (Jupyter’s display system), pandas, and matplotlib. ipywidgets and IPython types are mapped to MUI components rather than their respective components for being React compatible. Figure 4 illustrates a data-plot-from-tabular-data app that maps a pandas.DataFrame to a table and a matplotlib.figure.Figure to a chart.
Table 2:Default mapping from common multimedia/MIME types to components.
| Python type | As an input (argument) or output (return) | Widget |
|---|---|---|
ipywidgets.Password | Input | MUI TextField with type="password" |
ipywidgets.Image | Input | React Dropzone combine with MUI Components |
ipywidgets.Video | Input | React Dropzone combine with MUI Components |
ipywidgets.Audio | Input | React Dropzone combine with MUI Components |
ipywidgets.FileUpload | Input | React Dropzone combine with MUI Components |
IPython.display.HTML | Output | Raw HTML |
IPython.display.Markdown | Output | React Markdown |
IPython.display.JavaScript | Output | Raw JavaScript |
IPython.display.Image | Output | MUI CardMedia with component=img |
IPython.display.Video | Output | MUI CardMedia with component=video |
IPython.display.Audio | Output | MUI CardMedia with component=audio |
matplotlib.figure.Figure | Output | mpld3 |
pandas.DataFrame & pandera.typing.DataFrame | Input & Output | MUI DataGrid |
1 2 3 4 5 6 7 8 9 10 11 12 13 14 15 16import pandas, matplotlib.pyplot from numpy import arange, log from numpy.random import random def table_and_plot( df: pandas.DataFrame = pandas.DataFrame({ "a": arange(500) + random(500)/5, "b": random(500)-0.5 + log(arange(500)+1), "c": log(arange(500)+1) }) ) -> matplotlib.figure.Figure: fig = matplotlib.pyplot.figure() matplotlib.pyplot.plot(df["a"], df["b"], 'b') matplotlib.pyplot.plot(df["a"], df["c"], 'r') return fig
Program 4:A Python functions with a pandas.DataFrame input and a matplotlib.figure.Figure output. The corresponding GUI app is shown in Figure 4. The default values populate the table with random numbers.
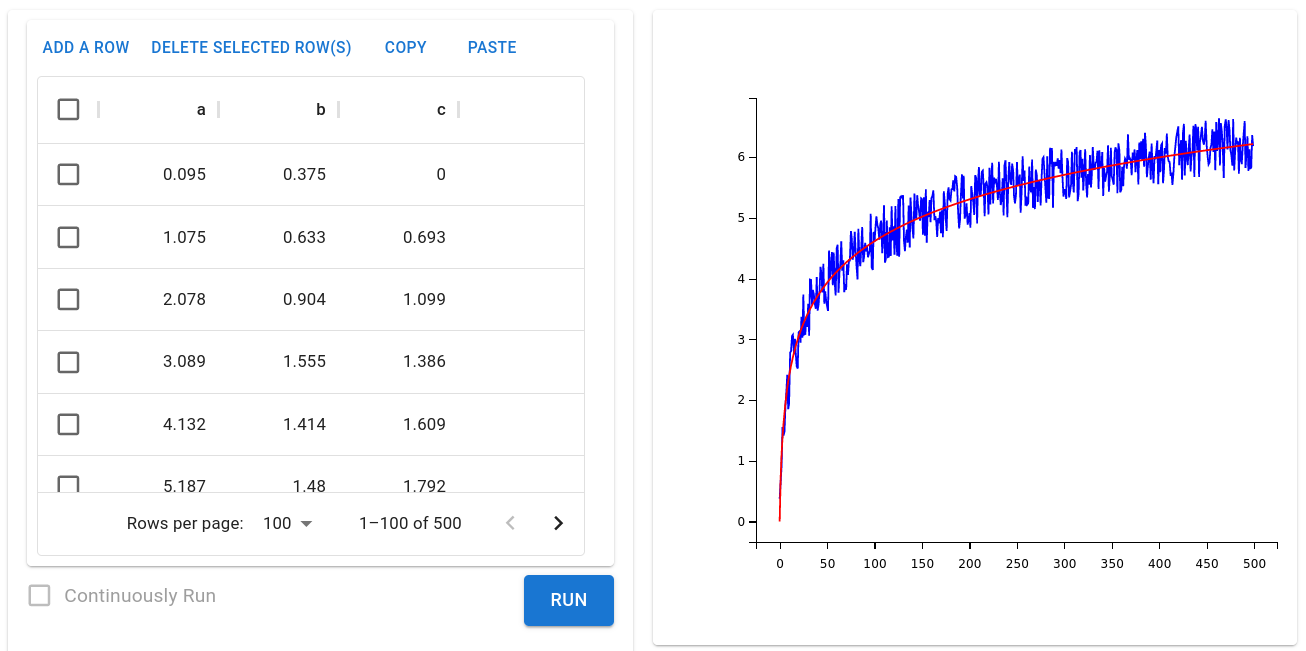
Figure 4:A data-plot-from-tablular-data app generated from Program 4 by Funix. The input panel contains a table (pandas.DataFrame) and the output panel contains a chart (matplotlib.figure.Figure). Both the table and the chart are interactive/editable. As far as we know, no other Python-based solutions supports editable tables as inputs.
4Customizing the type-to-widget mapping
Introducing a new type-to-widget mapping or modifying an existing one should not be the job of most Funix users but advanced users or user interface specialists. This is like most scientists who write papers in LaTeX do not develop the LaTeX classes or macros but just use them.
The default mapping from Python types to React components is detailed in the section above. To expand or modify an existing mapping, Funix provides two approaches: the on-the-fly, decorator-based approach and the reusable, theme-based approach.
As a transcompiler that generates React code, Funix does not have its own widget library.
Instead, developers can choose any React component on the market (as for now, only some MUI components are supported.) to use as the widget for a Python type.
Additionally, Funix allows configuring the properties (props) of the frontend widget in Python via JSON.
In this way, Funix bridges the Python world with the frontend world, making Python or JSON the surface language for React-based frontend development.
4.1Supporting a new type on the fly using the new_funix_type decorator
Program 5 defines a new type blackout, which a special case (as indicated by the inheritance) of str and binds it with a widget. Following the convention in the frontend world, Funix identifies a widget by its module specifier in npm, the de facto package manager in the frontend world. In Program 5, the widget is identified as @mui/material/TextField. Properties of the widget supported by its library for configuration can be modified in the new_funix_type decorator as well. As mentioned earlier, this allows a Pythonista to tap into a React component without frontend development knowledge.
The on-the-fly approach is only applicable when introducing a new type, e.g., a custom class. To modify the widget choice for an existing type, a theme must be used.
1 2 3 4 5 6 7 8 9 10 11 12 13 14 15 16from funix import new_funix_type @new_funix_type( widget = { "widget": "@mui/material/TextField", "props": { "type": "password", "placeholder": "Enter a secret here." } } ) class blackout(str): def print(self): return self + " is the message." def hoho(x: blackout = "Funix Rocks!") -> str: return x.print()
Program 5:An example of introducing a new type, binding it to a widget, and using it.
4.2Defining and using themes
A type-to-widget mapping can be reused and centralized managed via a theme, which is a simple JSON file. An example is given in Program 6 below where the Python’s native types str, int, and float are bound to three widgets. In this exmaple, besides using npm module specifier, Funix shorthand strings inputbox and slider are also used.
{
 "name": "grandma's secret theme", // space and punctuation allowed
 "widgets": {
   "str": "inputbox",        // Funix' shorthand, non-parametric
   "int": "slider[0,100,2]", // Funix' shorthand, parametric
   "float": {
       "widget": "@mui/material/Slider",
       // using MUI's widget
       // https://mui.com/material-ui/api/slider
       "props": {
           // config props of the frontend widget
           "min": 0,
           "max": 100,
           "step": 0.1
       }
   }
 }
}
Program 6:An example theme.
There are two ways to apply a theme: script-wide and function-wide. The script-wide approach (Program 7) applies a default theme to all functions in a script. The function-wide approach (Program 8) applies a theme to a specific function. In either case, the theme can be referred to by a web URL, a local file path, or a name/alias. If no theme is specified, Funix uses its default theme.
1 2 3 4 5 6 7import funix funix.set_default_theme("http://example.com/sunset_v2.json") # from web URL funix.set_default_theme("../../sunset_v2.json") # from local file funix.set_default_theme("grandma's secret theme") # from a name/alias
Program 7:Three ways to apply a theme script-wide.
1 2 3 4 5 6 7 8 9 10 11 12 13import funix @funix.funix(theme = "http://example.com/sunset.json") # from web URL def foo(): pass @funix.funix(theme = "../../themes/sunset.json") # from local file def foo(): pass @funix.funix(theme = "grandma's secret theme") # from a name/alias def foo(): pass
Program 8:Three ways to apply a theme function-wide.
To refer to a theme by its name or alias, it must be imported. The alias can be set when importing. A theme can be imported from a web URL, a local file path, or a JSON dictionary defining a theme (Program 9).
1 2 3 4 5 6 7 8 9 10 11 12 13 14 15 16 17 18 19 20 21funix.import_theme( "http://example.com/my_themes.json", # from web URL alias = "my_favorite_theme" # alias is optional ) funix.import_theme( "../../themes/my_themes.json", # from local file alias = "my_favorite_theme" # alias is optional ) theme_json = { # a Funix theme definition "name": "grandma's secret theme" "widgets" : { "range" : "inputbox" } } funix.import_theme( theme_json, # from a JSON theme definition alias = "granny's secret theme" # alias is optional )
Program 9:Three ways to import a theme. Note that theme importing is optional. The only benefit is to refer to a theme by its name or alias for easy switching.
5Building apps Pythonically
Funix leverages the language features of Python and common practices in Python development to make app building in Python more intuitive and efficient.
5.1Default values as placeholders
Python supports default values for keyword arguments. Funix directly uses them as the placeholder values for corresponding widgets. For example, default values in Program 2 are prefilled in Figure 2. A more complex example is the pandas.DataFrame initated with numpy columns in Program 4 are prefilled into the table in Figure 4. In contrast, Funix’ peer solutions require developers to provide the placeholder values the second time in the widget initiation.
5.2Making use of docstrings
Docstrings are widely used in the Python community. Information in docstrings is often needed in the GUI of an app. For example, the annotation of each argument can be displayed as a label or tooltip to explain the meaning of the argument to the app user. Therefore, Funix automatically incorporates selected information from docstrings into apps, eliminating the need for developers to manually add it, as required by other solutions.
Different sections of docstrings will be transformed into various types of information on the frontend.
The docstring above the first headed section (e.g., Parameters in this example) will be rendered as Markdown.
Argument annotations in the Args section will become labels in the UI.
The Examples section will provide prefilled example values for users to try out.
Funix currently supports only Google-style and Numpy-style docstrings.
Supports for sections beyond Args/Parameters and Examples and styles will be added in the future.
1 2 3 4 5 6 7 8 9 10 11 12 13 14 15 16 17 18def foo(x: str, y: int) -> str: """## What happens when you multiply a string with an integer? Try it out below. Parameters ---------- x : str A string that you want to repeat. y : int How many times you want to repeat. Examples ---------- >>> foo("hello ", 3) "hello hello hello " """ return x * y
Program 10:An example of a function with a Google-style docstring. The corresponding GUI app is shown in Figure 5.
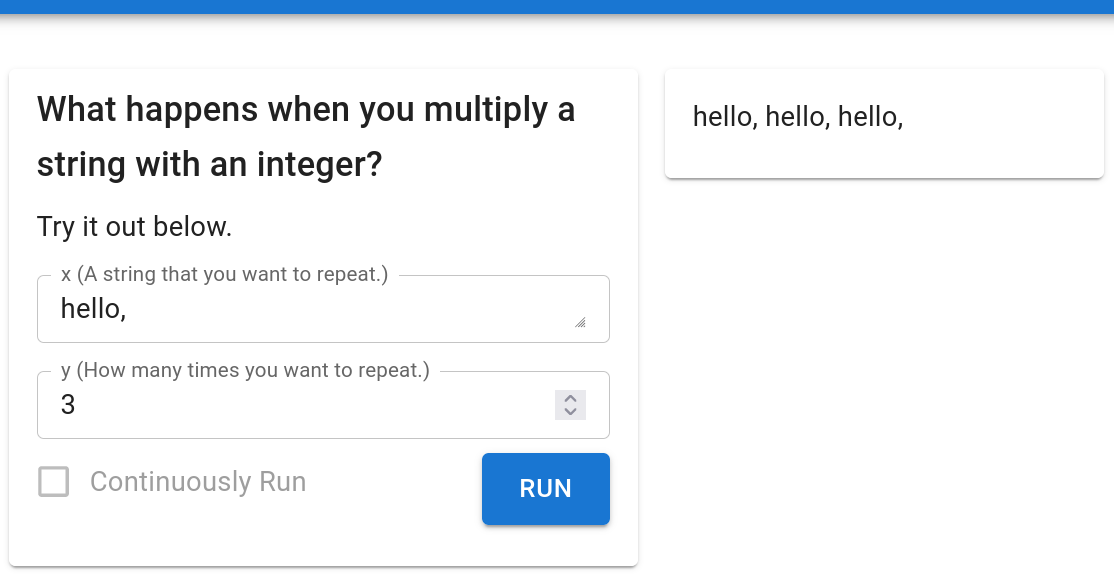
Figure 5:An app with input panel customized by Docstrings.
5.3Output layout in print and return
In Funix, by default, the return value of a function becomes the content of the output panel.
A user can control the layout of the output panel by returning strings, including f-strings, in Markdown and HTML syntaxes.
Markdown and HTML strings must be explicitly specified as IPython.display.Markdown and IPython.display.HTML, respectively.
Otherwise, the raw strings will be displayed.
Since Python supports multiple return values, you can mix Markdown and HTML strings in the return statement.
Quite often, we need to print out some information before a function reaches its return statement. The print function, a built-in feature of Python, is frequently used for this purpose.
Funix extends this convenience by redirecting the output of print to the output panel of an app.
Printout strings in Markdown or HTML syntax will be automatically rendered after syntax detection. To avoid conflicting with the default behavior of printing to stdout, printing to the web needs to be explicitly enabled using a Boolean decorator parameter print_to_web (See Program 11).
1 2 3 4 5 6 7 8 9 10 11 12 13 14 15 16 17from IPython.display import Markdown, HTML from typing import Tuple from funix import funix @funix(print_to_web=True) def foo(income: int = 200000, tax_rate: float= 0.45) -> Tuple[Markdown, HTML]: print (f"## Here is your tax breakdown: \n") tax_table = ( " | Item | $$$ | \n" " | --- | --- | \n" f"| Income | {income} | \n" f"| Tax | -{tax_rate * income : .3f} | \n" f"| Net Income | {income - tax_rate * income : .3f} | \n\n" ) return tax_table, "If you have any question, contact <a href='http://irs.gov'>IRS</a>."
Program 11:Use print and return to control the output layout. The corresponding GUI app is shown in Figure 6.

Figure 6:An app with output panel customized by print and return. Source code in Program 11.
5.4Streaming based on yield
In the GenAI era, streaming is a common method for returning lengthy text output from an AI model.
Instead of inventing a new mechanism to support streaming, Funix repurposes the yield keyword in Python to stream a function’s output.
The rationale is that return and yield are highly similar, and return is already used to display the final output in a Funix-powered app.
1 2 3 4 5 6 7 8 9 10 11 12 13import time def stream() -> str: """ ## Streaming demo in Funix To see it, simply click the "Run" button. """ message = "We the People of the United States, in Order to form a more perfect Union, establish Justice, insure domestic Tranquility, provide for the common defence, promote the general Welfare, and secure the Blessings of Liberty to ourselves and our Posterity, do ordain and establish this Constitution for the United States of America. " for i in range(len(message)): time.sleep(0.01) yield message[0:i]
Program 12:Python keyword yield is repurposed for streaming in Funix. The corresponding GUI app is shown in Figure 7.
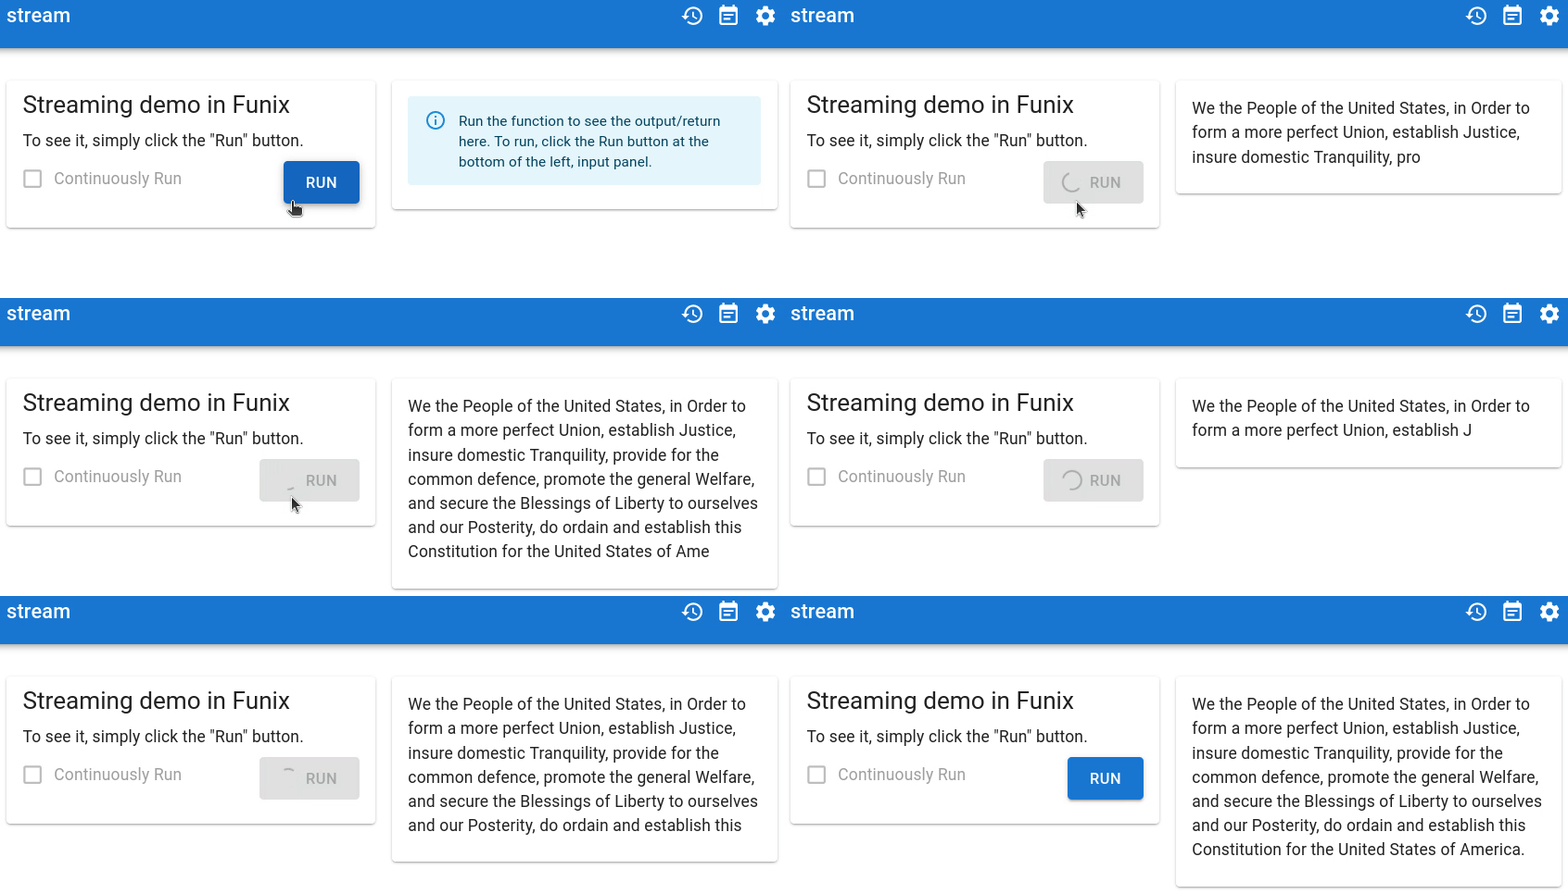
Figure 7:The streaming demo in Funix. Source code in Program 12.
5.5States, sessions, and multi-page apps
5.5.1A simple approach by using global
In Funix, maintaining states is as simple as updating a global variable.
By leveraging the semantics of global variables which are a native feature of the Python language, Funix saves developers the burden of learning something new in Funix.
1 2 3 4 5 6 7 8 9 10 11 12 13 14from IPython.display import Markdown secret_word = "funix" used_letters = [] # a global variable to maintain the state/session def guess_letter(Enter_a_letter: str) -> Markdown: letter = Enter_a_letter # rename global used_letters # state/session as global used_letters.append(letter) answer = "".join([ (letter if letter in used_letters else "_") for letter in secret_word ]) return f"### Hangman \n `{answer}` \n\n ---- \n ### Used letters \n {', '.join(used_letters)}"
Program 13:A simple Hangman game in Funix that uses the global keyword to maintain the state. This solution is much shorter than using peer solutions, such as in Gradio.
A security risk is that there is only one backend server for the Funix app and consequently a global variable is accessible by all browser sessions of the app.
To eliminate this risk, Funix provides a simple command-line flag -t at the launch of the Funix app to sessionize all global variables.
If the developer on purpose wants to share the data among different connections, the -t flag can be omitted.
5.5.2Multi-page apps from classes
A special but useful case that requires maintaining states is multi-page apps. A multi-page app consists of multiple pages or tabs that share the same variable space. Values of variables set on one page can be accessed on another page.
Without reinventing the wheel, Funix supports this need by turning a Python class into a multi-page app.
Each member function of the class becomes a page of the multi-page app, and pages can exchange data via the self variable.
Specifically, the constructor (__init__) becomes the landing page of the multi-page app.
Since each instance of the class is independent, the multi-page app is automatically sessionized for different connections from browsers without needing to set the -t flag.
Program 14 is a Python class of three member methods, which are turned into three pages of the GUI app by Funix (Figure 8). The GIF shows that values of self.a set in either the contructor or updated in the set method can be accessed in the get method.
In this approach, a Funix developer does not need to learn anything new and can easily build a mulit-page app from the OOP principles they are already familiar with.
1 2 3 4 5 6 7 8 9 10 11 12 13 14 15 16 17 18 19 20 21 22 23from funix import funix_method from IPython.display import Markdown, HTML class A: @funix_method(print_to_web=True) def __init__(self, a: int): self.a = a print(f"`self.a` has been initialized to {self.a}") def set(self, b: int) -> Markdown: """Update the value for `self.a`. """ old_a = self.a self.a = b return ( "| var | value |\n" "| ----| ------|\n" f"| `a` before | {old_a} |\n" f"| `a` after | {self.a} |" ) def get(self) -> HTML: """Check the value of `self.a`. """ return f"The value of <code>self.a</code> is <i>{self.a}</i>. "
Program 14:A simple multi-page app in Funix leveraging OOP. The corresponding GUI app is shown in Figure 8.
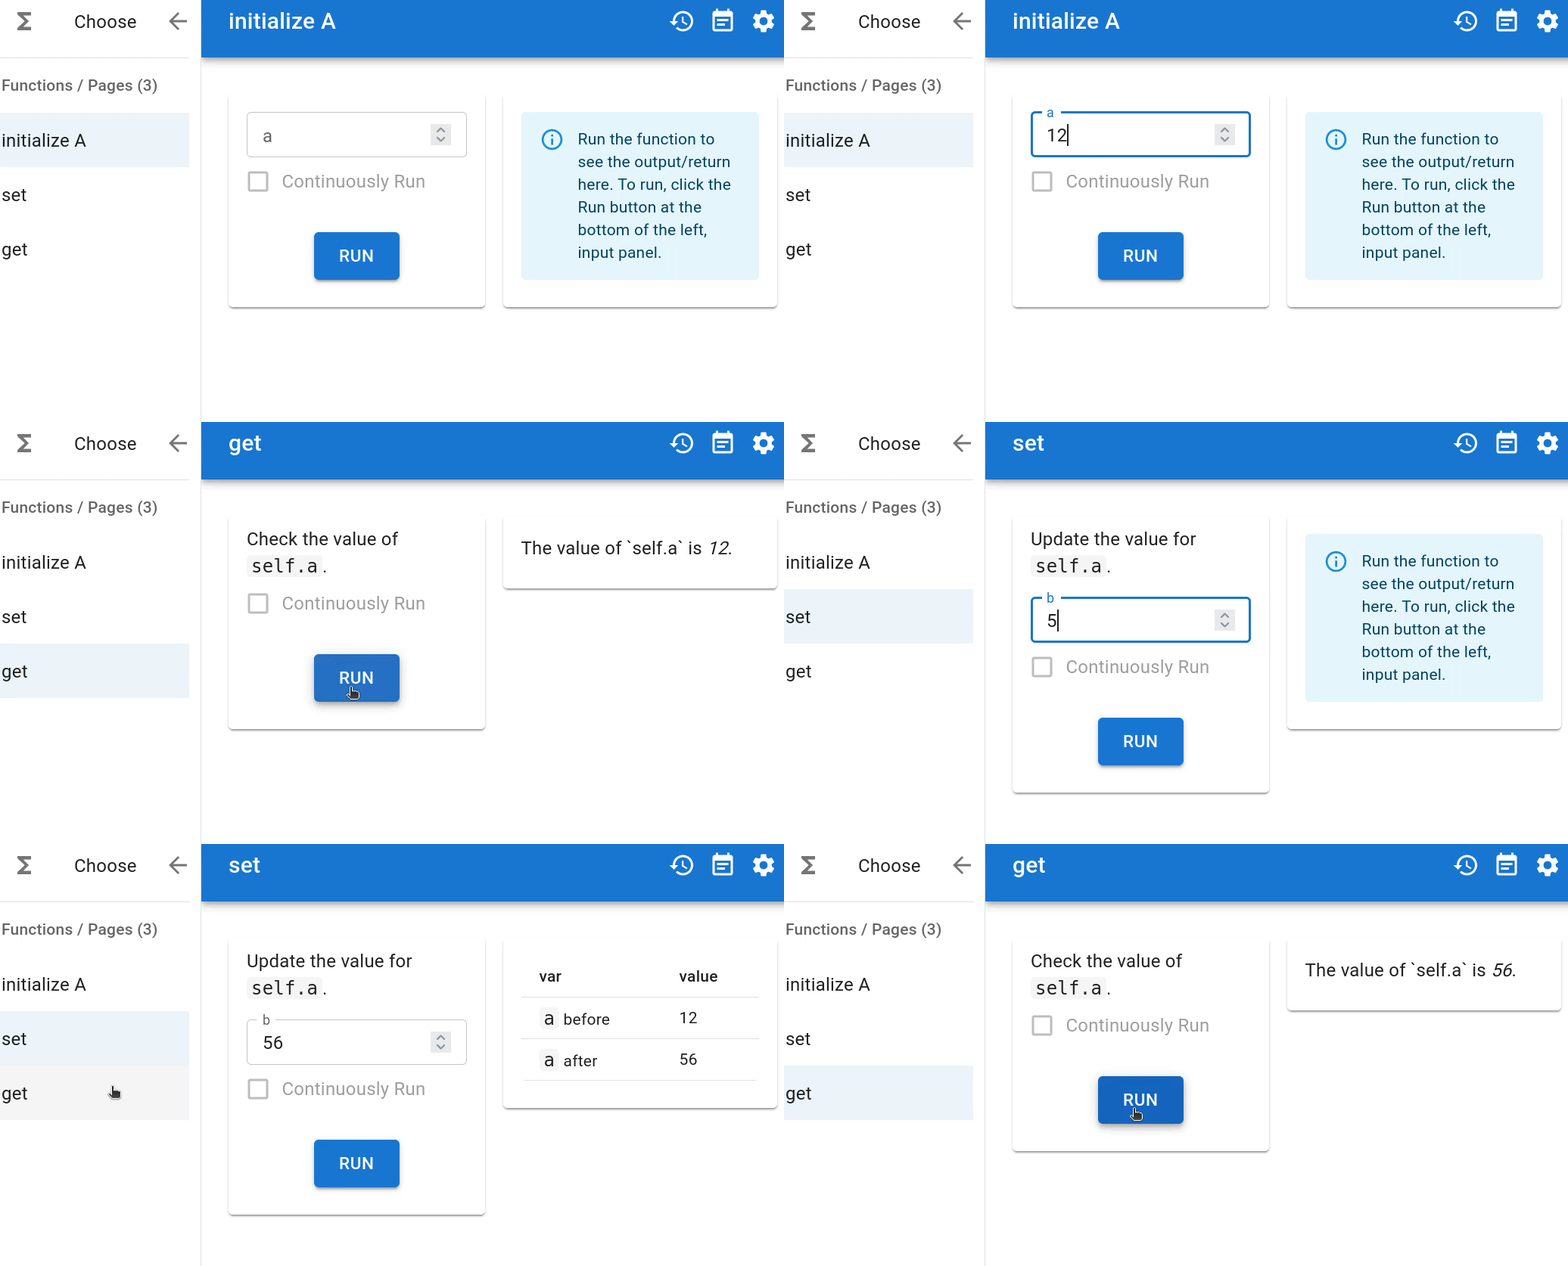
Figure 8:A multiplage app generated by Funix from a class of three member methods including the constructor. Source code in Program 14
6The Funix decorators
Although Funix relies on the Python language (including type hints and docstrings) to define GUI apps,
there are still some aspects of an app’s appearance and behavior that remain uncovered.
This is where the @funix decorator comes into play. One example, as mentioned above (Section 5.3), is redirecting the print output from stdout to the output panel of an app. Here, we provide a few more examples. For full details on Funix decorators, please refer to the Funix reference manual.
6.1Overriding the type-based widget choice
Funix uses types to determine the widgets. However, there may be needs to manually pick a widget. The @funix dectorator has a widgets parameter for this purpose.
Program 15 is an example to temporarily override the widget choice for two variables of the types Literal and List[Literal] respectively. The corresponding app (Figure 9) is a sentence builder. The Funix-based code is much shorter and more human-readable than its Gradio-based counterpart, thanks to leveraging the Python-native features like automatic rendering the return strings or default values.
1 2 3 4 5 6 7 8 9 10 11 12 13 14 15 16 17 18from funix import funix from typing import Literal, List @funix( widgets={ "animal": "inputbox", "activities": "inputbox", } ) def sentence_builder( count: range(2, 21) = 4, animal: Literal["cat", "dog", "bird"] = "cat", countries: List[Literal["USA", "Japan", "Pakistan"]] = ["USA", "Pakistan"], location: Literal["park", "zoo", "road"] = "park", activities: List[Literal["ran", "swam", "ate", "slept"]] = ["swam", "slept"], in_morning: bool = False ) -> str: return f"""The {count} {animal}s from {" and ".join(countries)} went to the {location} where they {" and ".join(activities)} until the {"morning" if in_morning else "night"}"""
Program 15:The Funix implementation of a sentence builder. The funix decorator overwrites the theme-based widgets choices of two arguments.
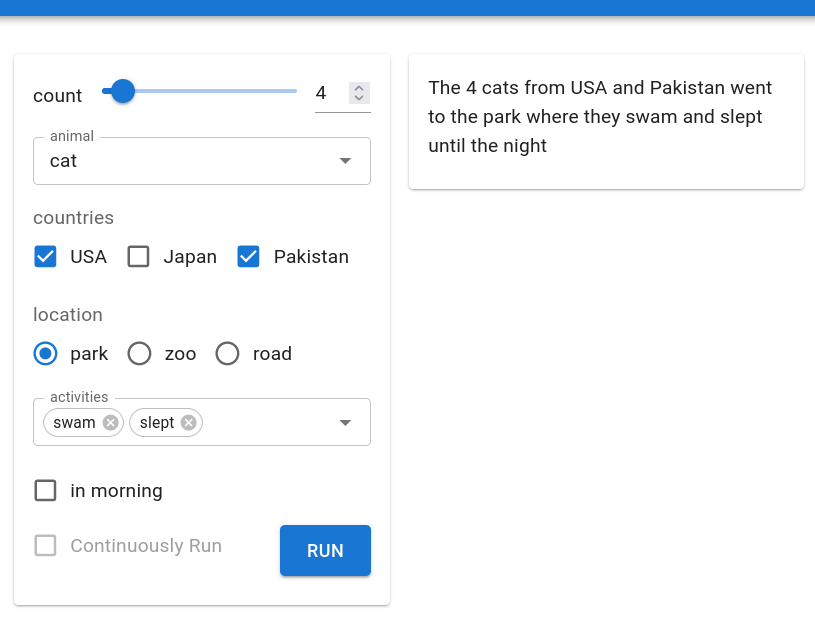
Figure 9:The sentence builder app in Funix. Source code in Program 15. Gradio-based version here.
6.2Automatic re-run triggered by input changes
As mentioned earlier, Funix is suitable for straightforward input-output processes. Such a process is triggered once when the “Run” button is clicked. This may work for many cases but in many other cases, we may want the output to be updated following the changes in the input end automatically.
To do so, simply toggle on the autorun parameter in the @funix decorator. This will activate the “continuously run” checkbox on the input panel.
1 2 3 4 5 6 7 8 9 10 11 12import matplotlib.pyplot, matplotlib.figure from ipywidgets import FloatRangeSlider import numpy from funix import funix @funix(autorun=True) def sine(omega: FloatRangeSlider[0, 4, 0.1]) -> matplotlib.figure.Figure: fig = matplotlib.pyplot.figure() x = numpy.linspace(0, 20, 200) y = numpy.sin(x * omega) matplotlib.pyplot.plot(x, y, linewidth=5) return fig
Program 16:A sine wave plotter that re-visualizes the function whenever input changes, kept on using the autorun parameter in @funix decorator. The corresponding GUI app is shown in Figure 10.
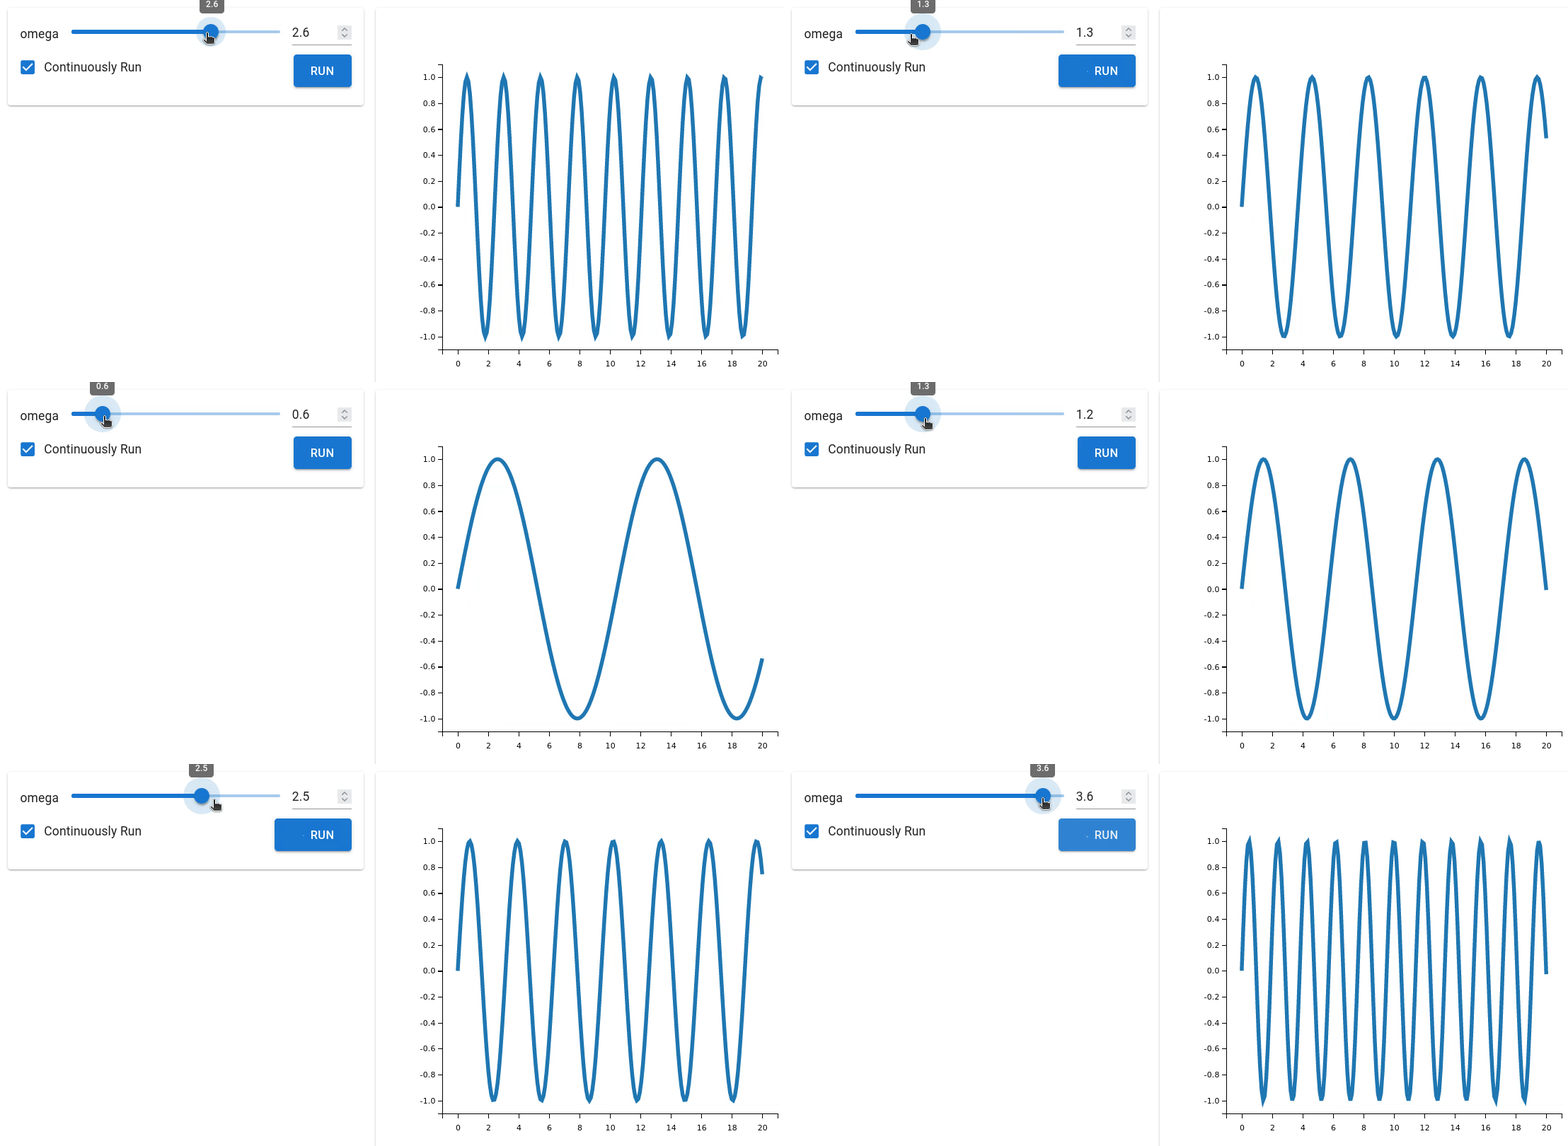
Figure 10:A sine wave generator with the autorun parameter toggled on. Source code in Program 16.
6.3Conditional visibility
Although interactivity is not a strong suit of Funix for reasons aforementioned, Funix still supports some common interactivity features. One of them is “conditional visibility” which reveal some widgets only when certain conditions are met (Program 17 and Figure 11).
1 2 3 4 5 6 7 8 9 10 11 12 13 14 15 16 17 18 19 20 21 22 23 24 25import typing import openai import funix @funix.funix( conditional_visible=[ { "when": {"show_advanced": True,}, "show": ["max_tokens", "model", "openai_key"] } ] ) def ChatGPT_advanced( prompt: str, show_advanced: bool = False, model : typing.Literal['gpt-3.5-turbo', 'gpt-3.5-turbo-0301']= 'gpt-3.5-turbo', max_tokens: range(100, 200, 20)=140, openai_key: str = "" ) -> str: completion = openai.ChatCompletion.create( messages=[{"role": "user", "content": prompt}], model=model, max_tokens=max_tokens, ) return completion["choices"][0]["message"]["content"]
Program 17:Conditional visibility in @funix decorator. App in action is shown in Figure 11.
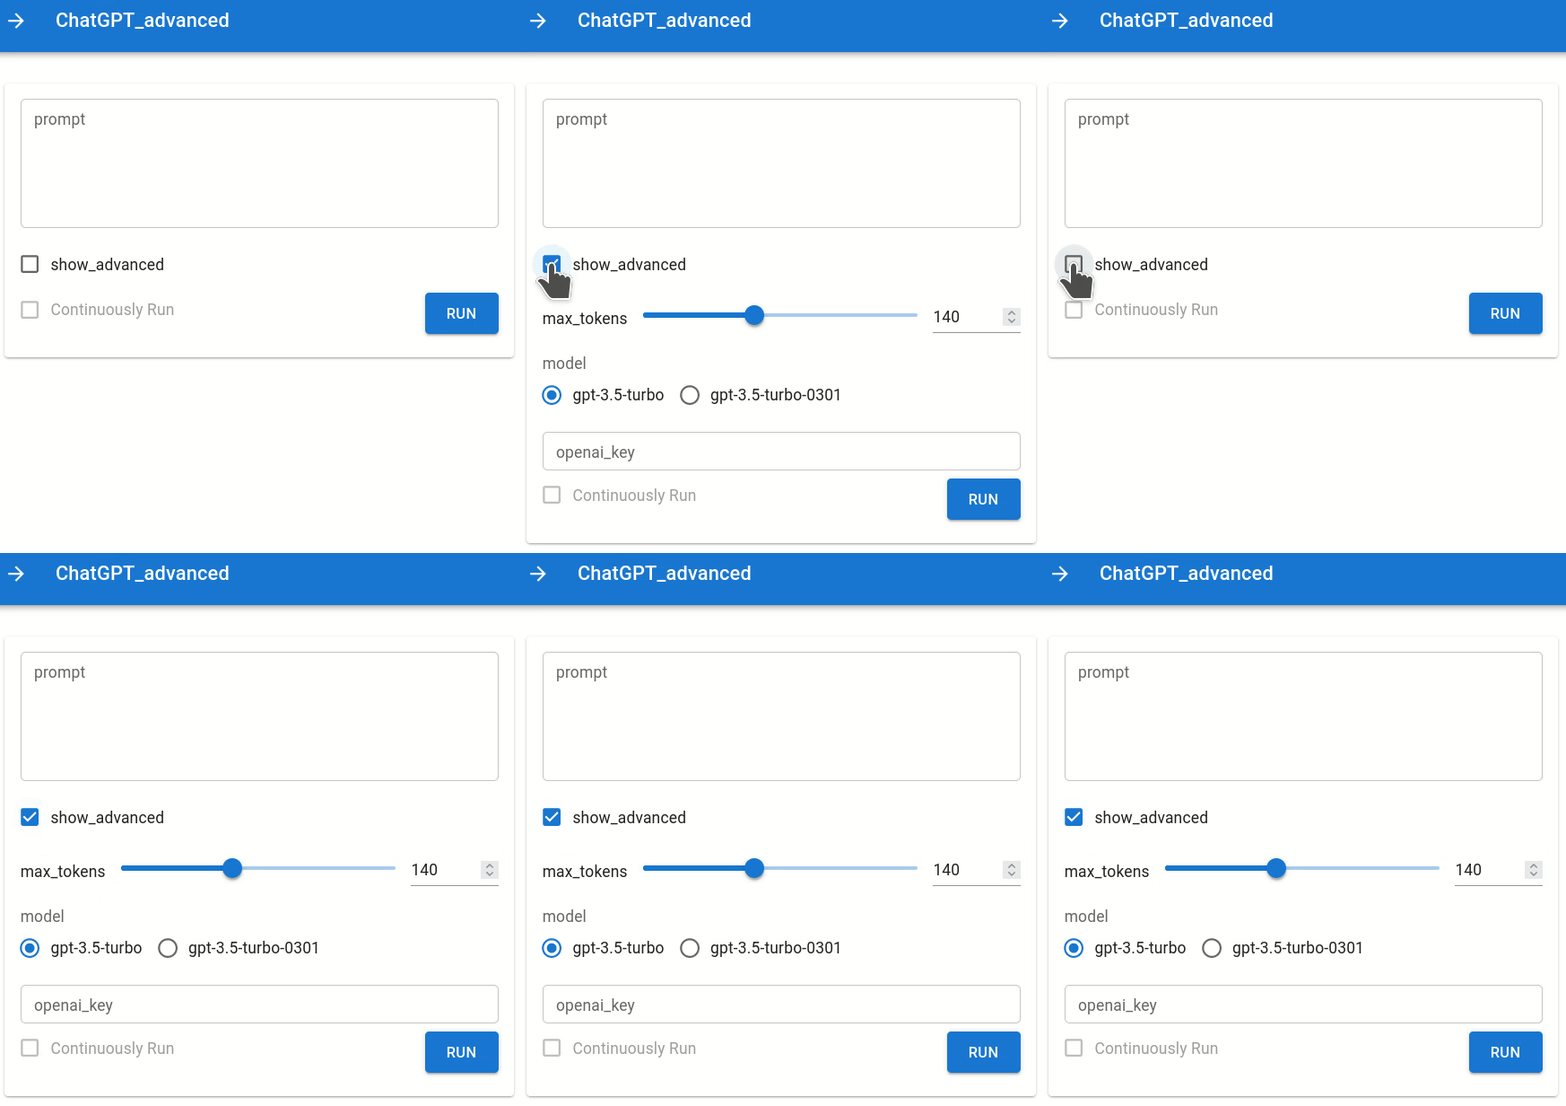
Figure 11:An advanced ChatGPT app that only displays advanced options when the show_advanced checkbox is checked. Source code in Program 17.
6.4Rate limiting
When an app is exposed, a common concern is how to avoid abuses. Rate limiting is a common measure to this. Funix’s @funix decorator supports rate limiting based on both browser sessions and time.
6.5Reactive apps
Funix can dynamically prefill widgets based on information from other widgets. We call this “reactive.” An example is given in Program 18. The tax argument of the function is populated automatically based on the values of salary and income_tax_rate as the user enters.
1 2 3 4 5 6 7 8 9 10 11 12 13 14 15from funix import funix def __compute_tax(salary: float, income_tax_rate: float) -> int: return salary * income_tax_rate @funix( reactive={"tax": __compute_tax} ) def after_tax_income_calculator( salary: float, income_tax_rate: float, tax: float) -> str: return f"Your take home money is {salary - tax} dollars,\ for a salary of {salary} dollars, \ after a {income_tax_rate*100}% income tax."
Program 18:A reactive app.
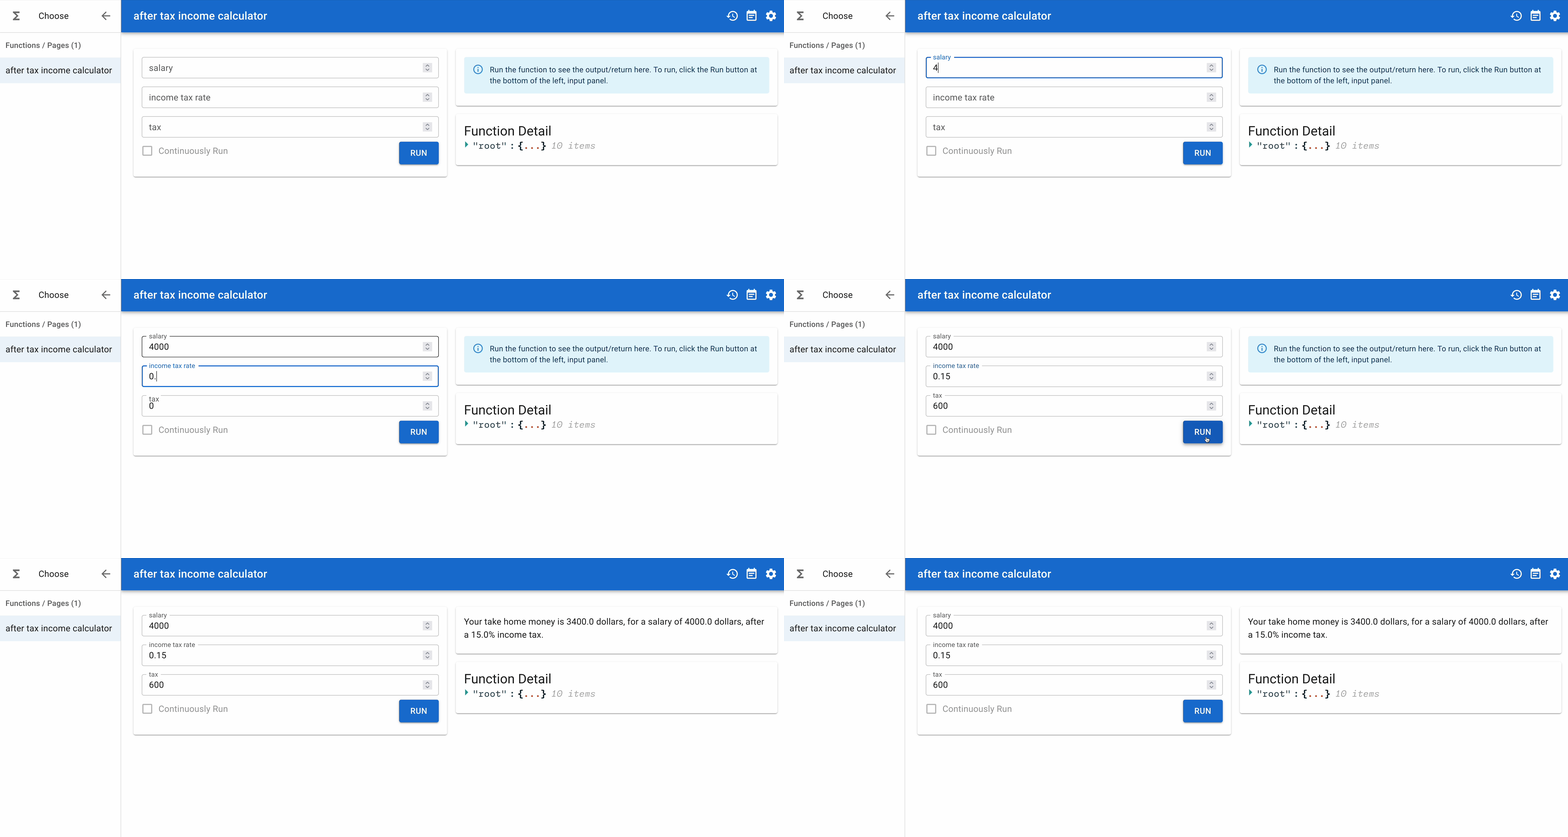
Figure 12:A reactive app in Funix. Source code in Program 18.
6.6Showing source code
Lastly, togging on show_source parameter in @funix can enable the source code of your app to be displayed.
7Jupyter support
Jupyter is a popular tool for Python development. Funix supports turning a Python function/class defined in a Jupyter cell into an app inside Jupyter.
To do so, simply add the @funix decorator to the function/class definition and run the cell (Figure 13).
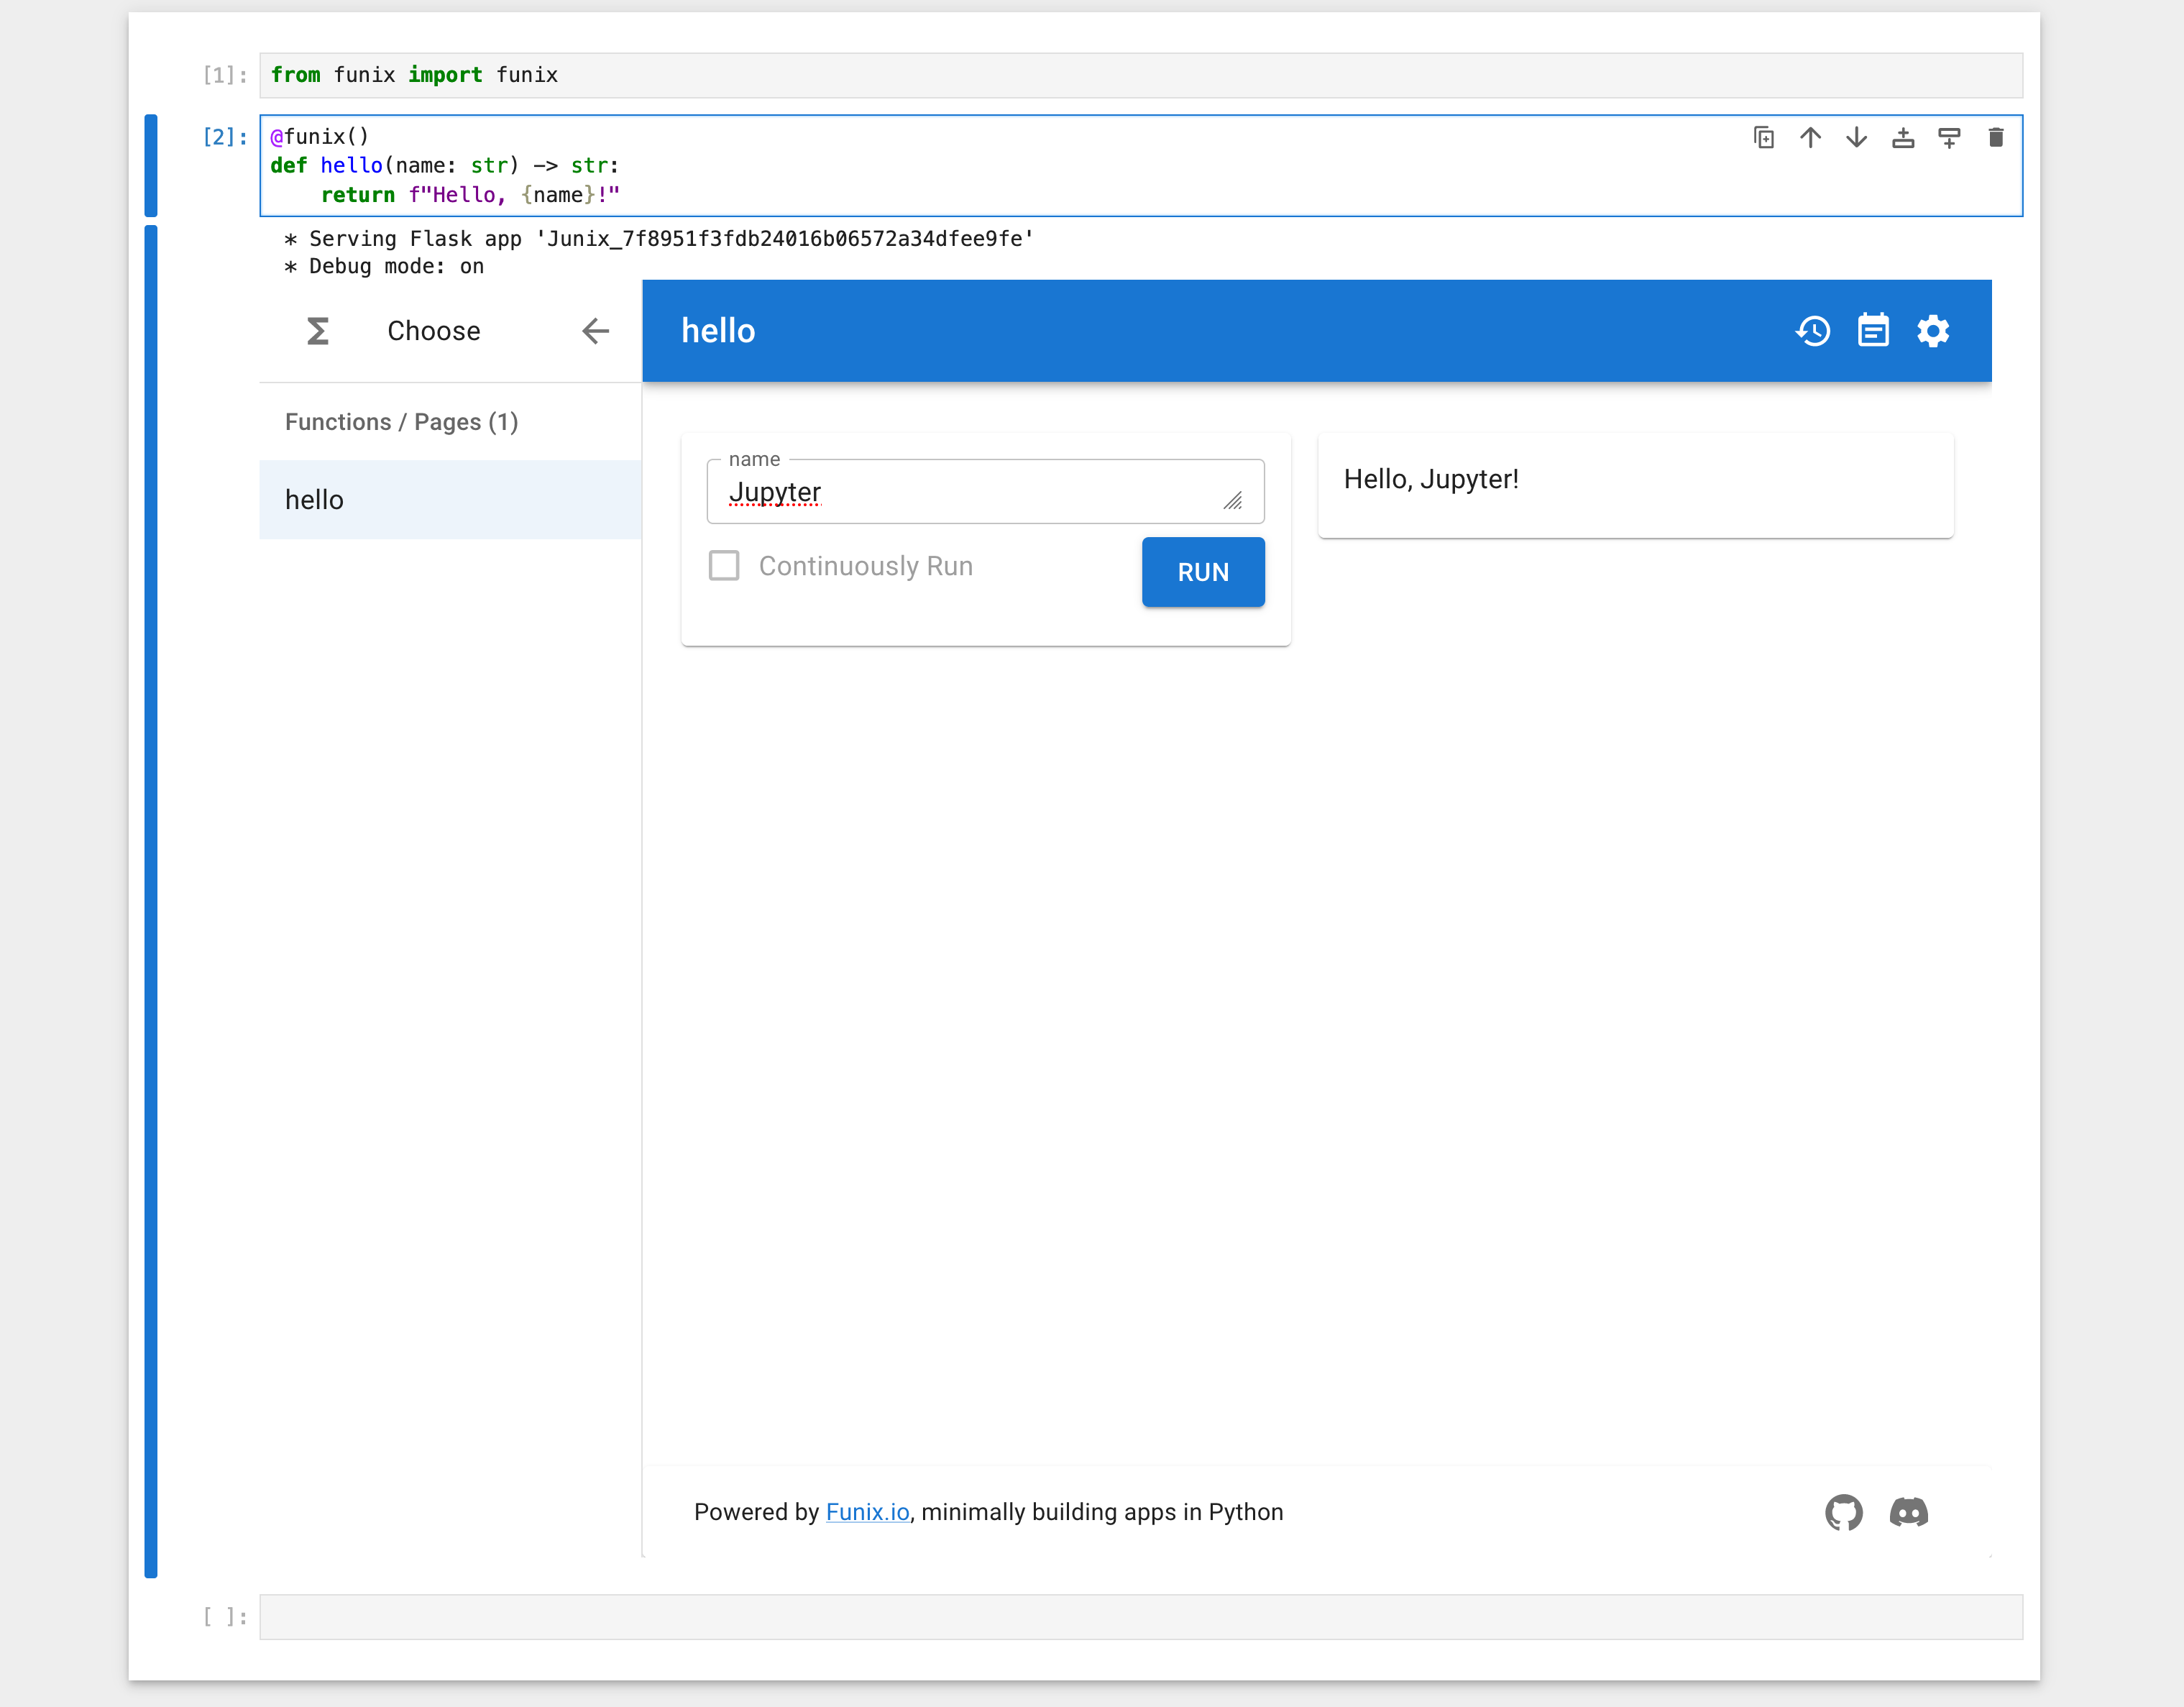
Figure 13:Funix working in Jupyter.
8Showcases
Lastly, please allow us to use some examples to demonstrate the convenient and power of Funix in quickly prototyping apps. If there is any frontend knowledge needed, it is only HTML.
8.1Wordle
The source code can be found here. In Funix, only simple HTML code that changes the background colors of tiles of letters according to the rules of the game Wordle is needed. A GIF showing the game in action is in Figure 14.
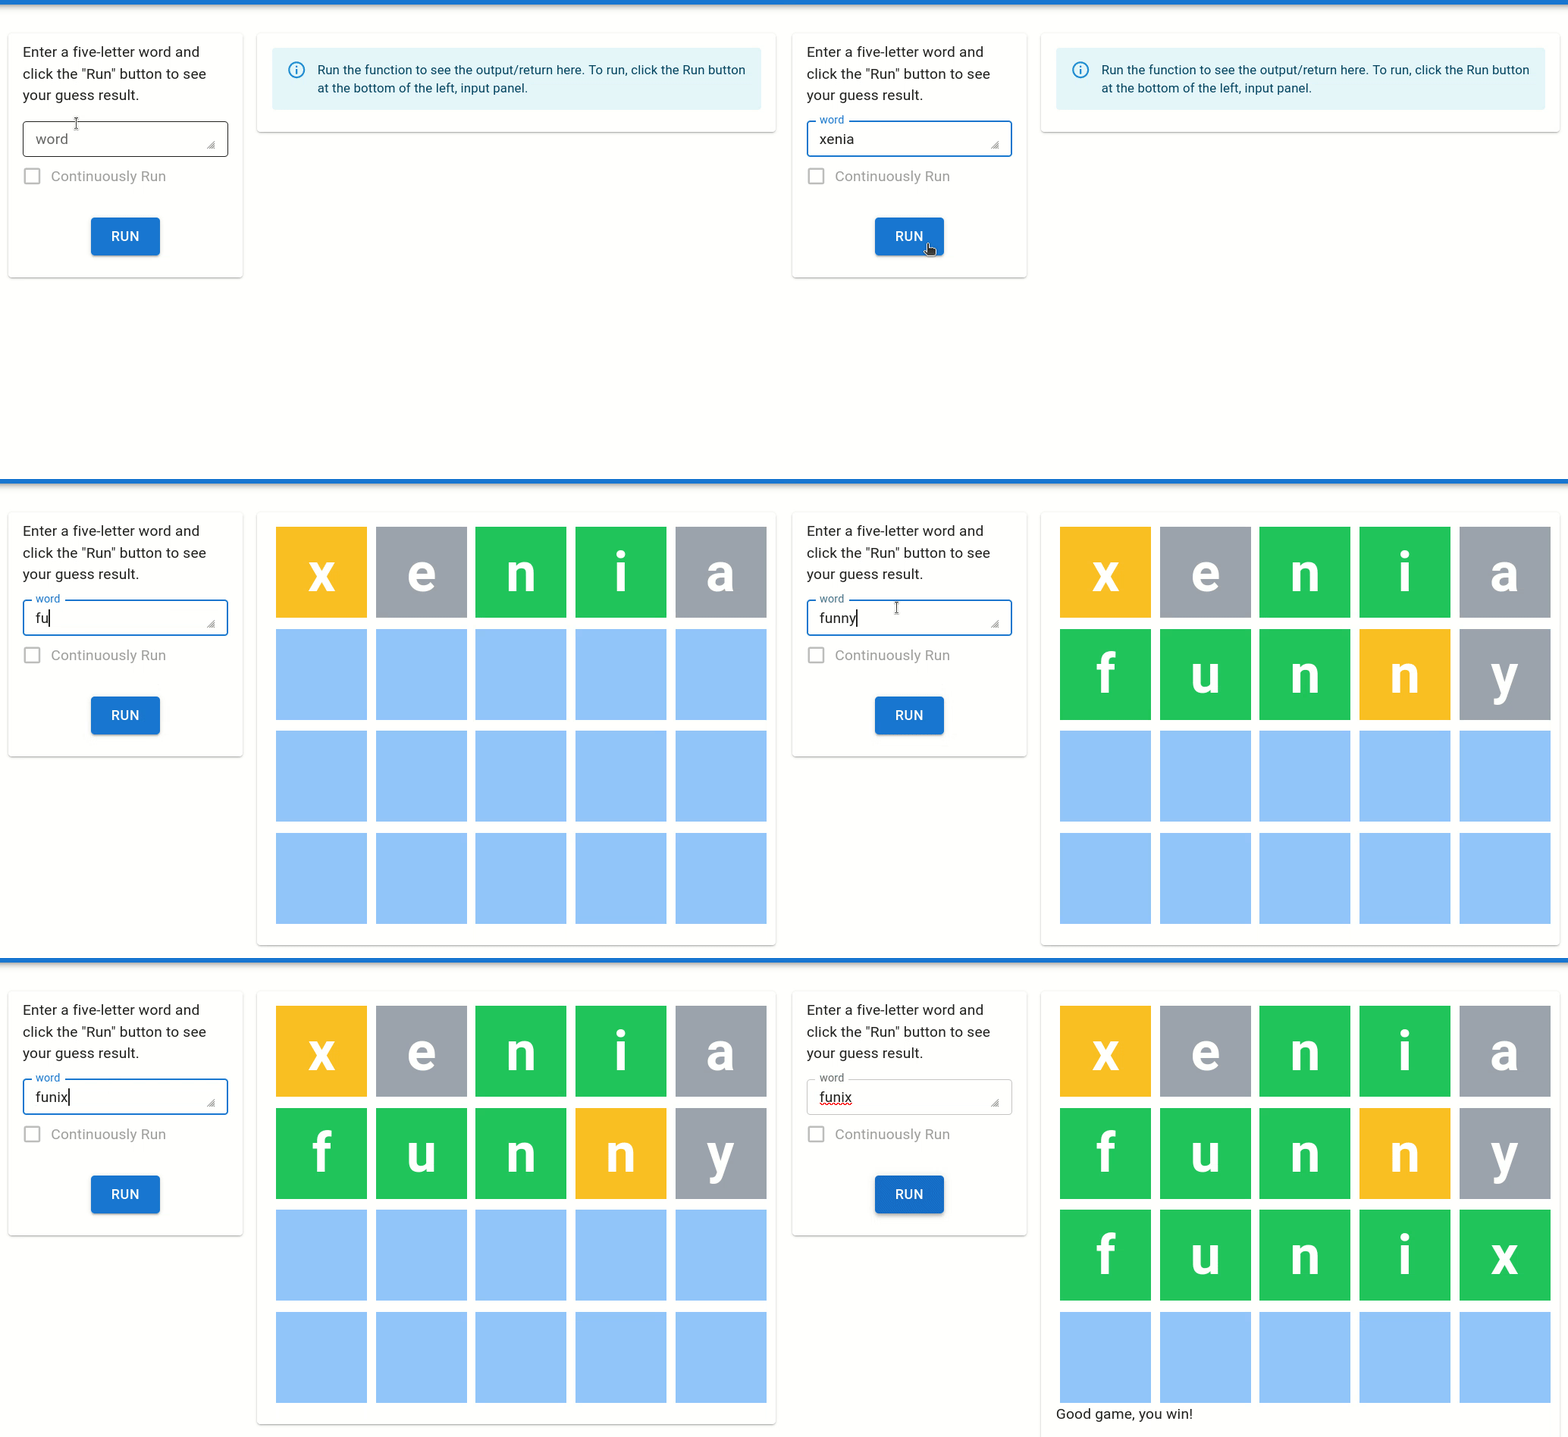
Figure 14:The Wordle game implemented in Funix. Source code here.
8.2ChatGPT multi-turn
Funix does not have a chat widget, because it is so easy (less than 10 lines in Program 19) to build one using simple alignment controls in HTML. The only thing Funix-specific in the code is using the @funix decorator to change the arrangement of the input and output panels from the default left-right to top-down for a more natural chat experience.
1 2 3 4 5 6 7 8 9 10 11 12 13 14 15 16 17 18 19 20 21 22 23 24 25 26 27 28 29import IPython from openai import OpenAI import funix client = OpenAI() messages = [] # list of dicts, dict keys: role, content, system. Maintain the conversation history. def __print_messages_html(messages): printout = "" for message in messages: if message["role"] == "user": align, left, name = "left", "0%", "You" elif message["role"] == "assistant": align, left, name = "right", "30%", "ChatGPT" printout += f'<div style="position: relative; left: {left}; width: 70%"><b>{name}</b>: {message["content"]}</div>' return printout @funix.funix( direction="column-reverse", ) def ChatGPT_multi_turn(current_message: str) -> IPython.display.HTML: current_message = current_message.strip() messages.append({"role": "user", "content": current_message}) completion = client.chat.completions.create(messages=messages) chatgpt_response = completion.choices[0].message.content messages.append({"role": "assistant", "content": chatgpt_response}) return __print_messages_html(messages)
Program 19:Multiturn chatbot using Funix.
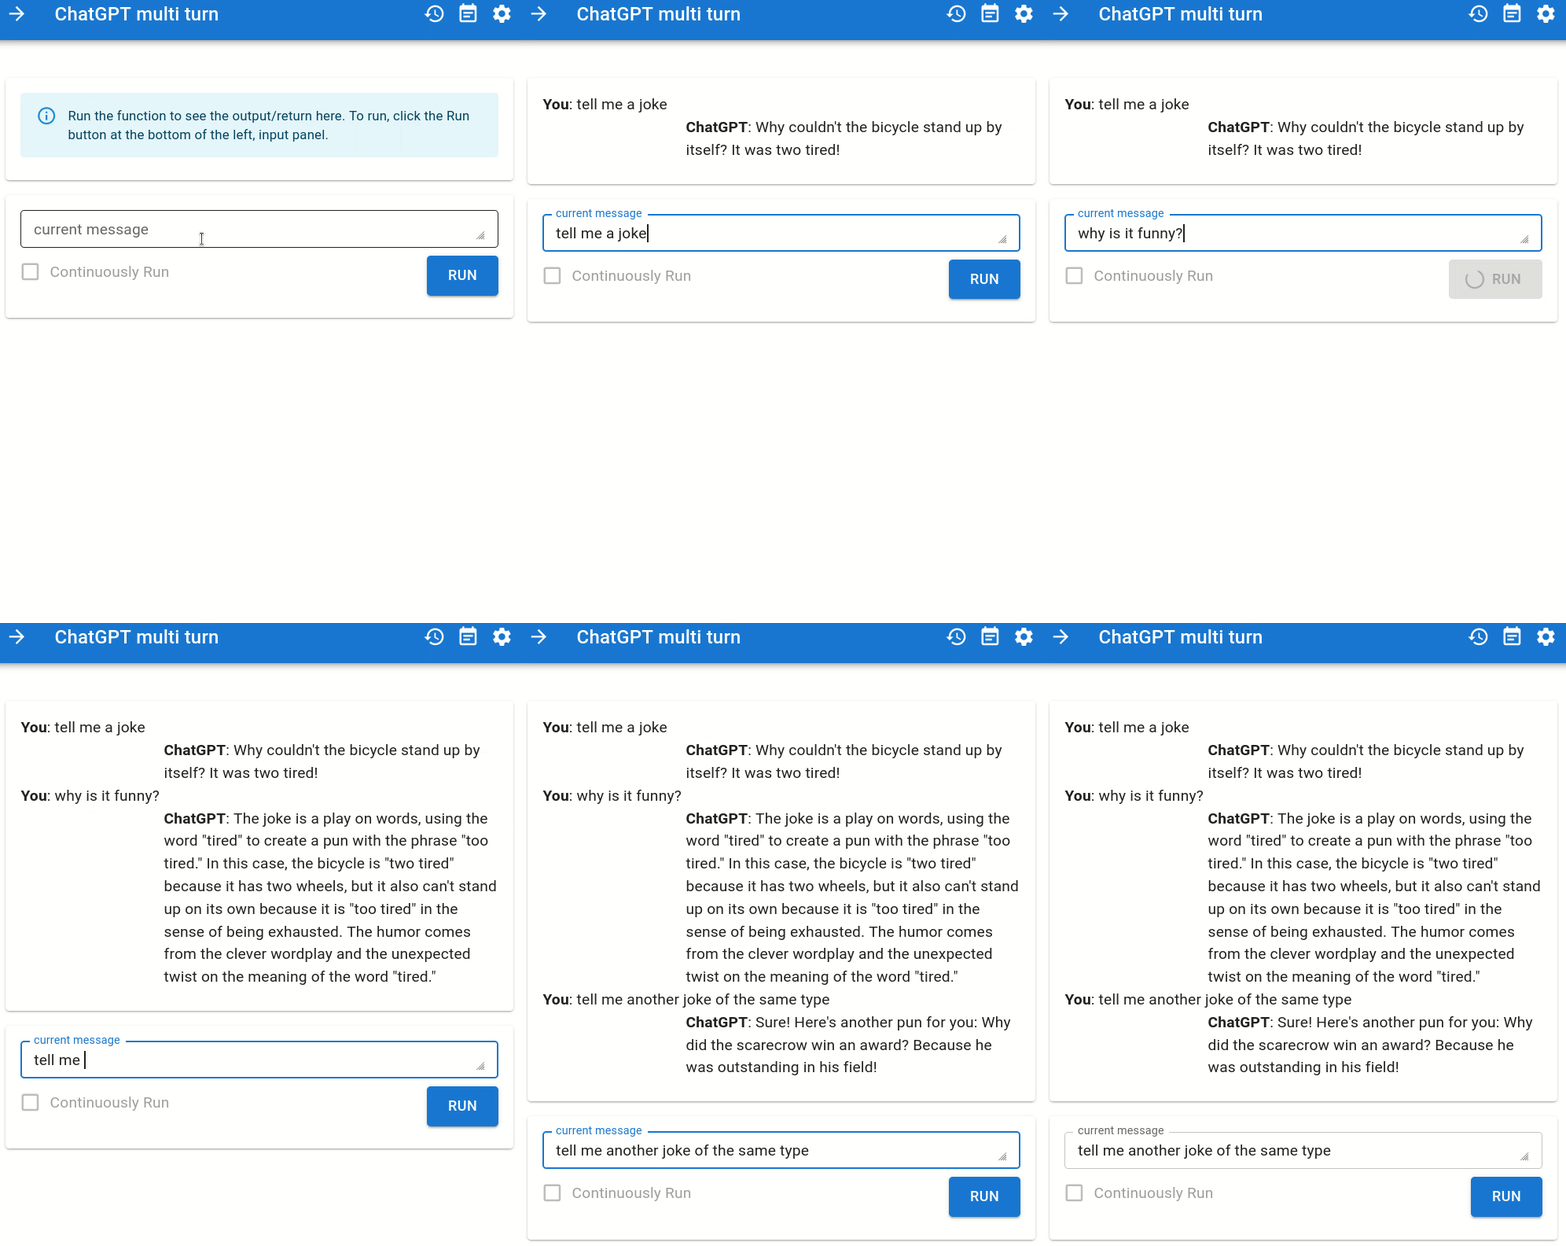
Figure 15:A multi-turn chatbot in Funix in action. Source code in Program 19.
8.3Multimodal inputs
Funix extends the support to ipywidgets.{Image, Audio, File, Video} to allow drag-and-drop of multimedia files or push-to-capture audio or video from the computer’s microphone or webcam.
1 2 3 4 5 6 7 8 9 10 11 12 13 14 15 16 17 18 19 20 21 22 23 24 25 26 27 28 29 30 31 32import openai import base64 from ipywidgets import Image client = openai.OpenAI() def image_reader(image: Image) -> str: """ # What's in the image? Drag and drop an image and see what GPT-4o will say about it. """ # Based on https://platform.openai.com/docs/guides/vision # with only one line of change response = client.chat.completions.create( model="gpt-4o", messages=[ { "role": "user", "content": [ {"type": "text", "text": "What's in this image?"}, {"type": "image_url", "image_url": { "url":f"data:image/png;base64,{base64.b64encode(image).decode()}", }, }, ], } ], ) return response.choices[0].message.content
Program 20:A multimodal input demo in Funix built by simply wrapping OpenAI’s GPT-4o demo code into a function with an ipywidgets.Image input and a str output. The corresponding GUI app is shown in Figure 16.
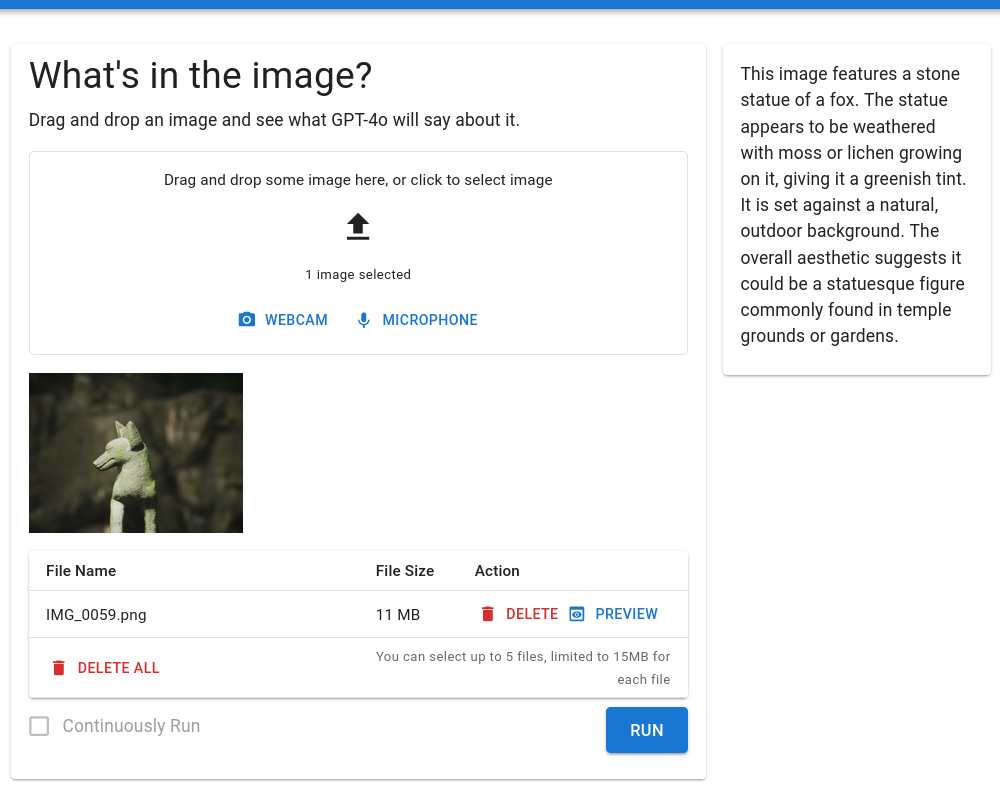
Figure 16:Funix maps a ipywidgets.{Image, Audio, Video, File}-type arguments to a drag-and-drop file uploader with push-to-capture ability from the microphone or webcam of the computer. The corresponding source code is in Program 20.
8.4Vector stripping in bioinformatics
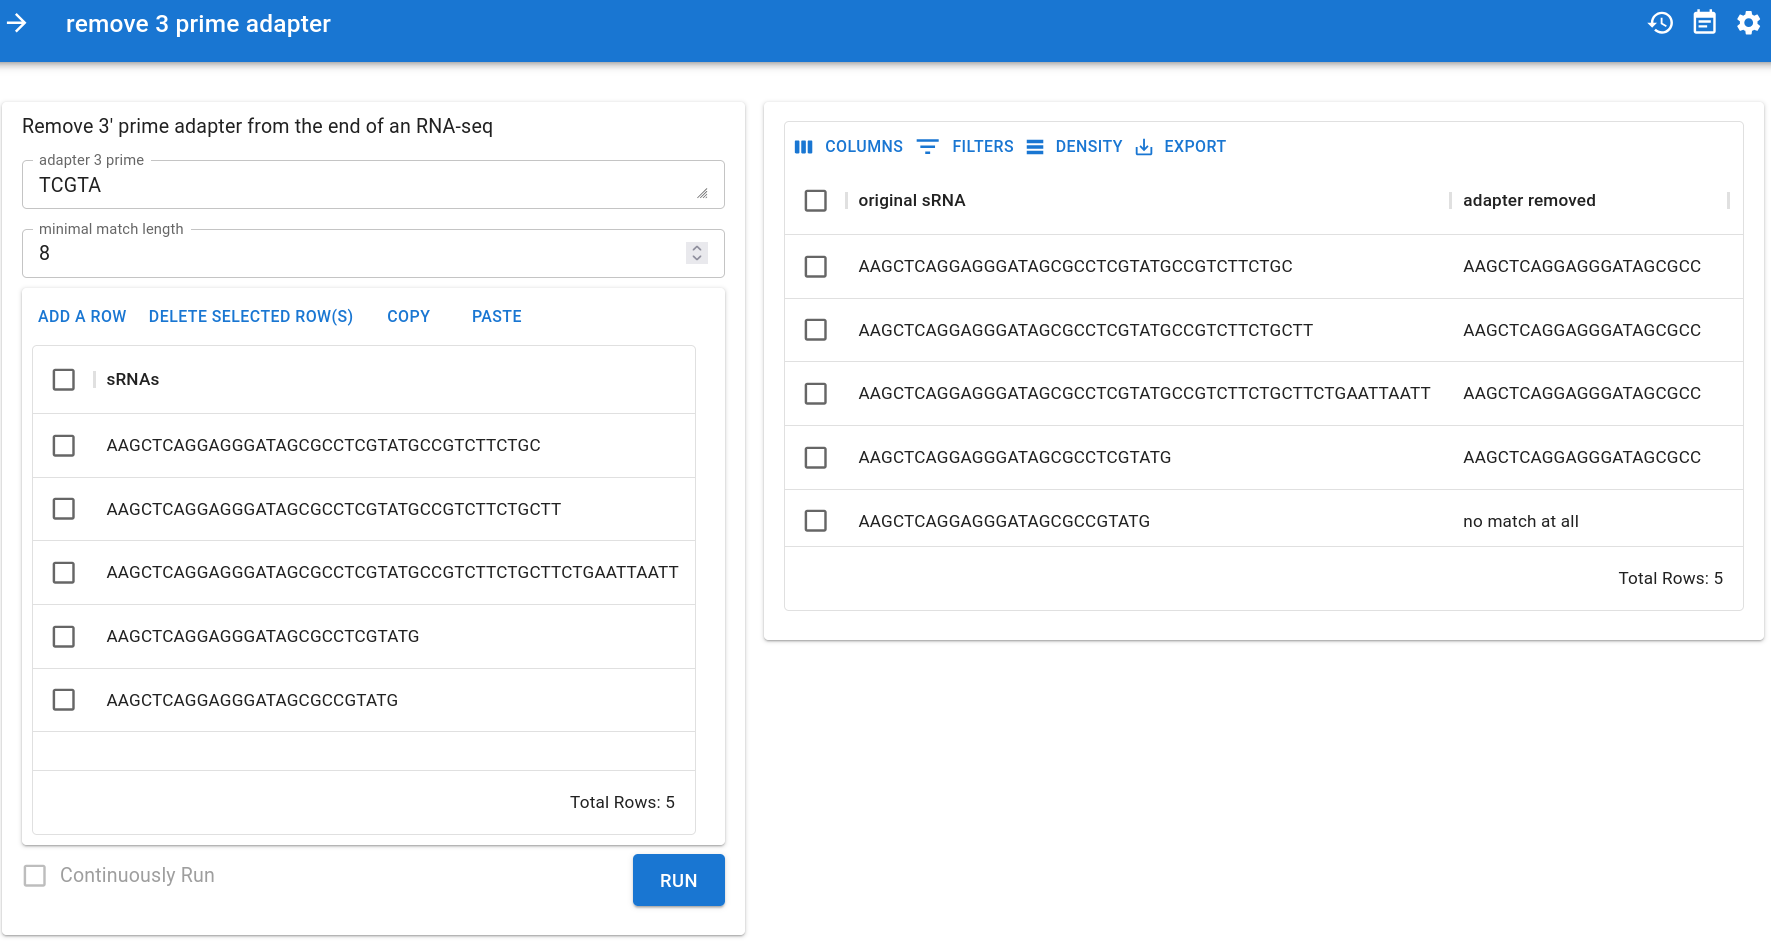
A vector is a nucleotide sequence that is appended to a nucleotide sequence of interest for easy handling or quality control. It is added before the sequencing process and should be removed after the sequence is read. Vector stripping is the process of removing vectors. A vector stripping app only involves simple data structures, such as strings, lists of strings, and numeric parameters. This is a sweet spot of Funix.
Because the bioinformatics part of vector stripping is lengthy, we only show the interface function in Program 21 and the full source code can be found here. pandas.DataFrame’s are used in both the input and output of this app, allowing biologists to batch process vector stripping by copy-and-pasting their data to Excel or Google Sheets, or uploading/downloading CSV files.
1 2 3 4 5 6 7 8 9 10 11 12 13 14 15 16 17 18 19 20 21 22 23def remove_3_prime_adapter( adapter_3_prime: str="TCGTATGCCGTCTTCTGCTT", minimal_match_length: int = 8, sRNAs: pandas.DataFrame = pandas.DataFrame( { "sRNAs": [ "AAGCTCAGGAGGGATAGCGCCTCGTATGCCGTCTTCTGC", # shorter than full 3' adapter "AAGCTCAGGAGGGATAGCGCCTCGTATGCCGTCTTCTGCTT", # full 3' adapter # additional seq after 3' adapter, "AAGCTCAGGAGGGATAGCGCCTCGTATGCCGTCTTCTGCTTCTGAATTAATT", "AAGCTCAGGAGGGATAGCGCCTCGTATG", # <8 nt io 3' adapter "AAGCTCAGGAGGGATAGCGCCGTATG", # no match at all ] } ), # ) -> pandera.typing.DataFrame[OutputSchema]: ) -> pandas.DataFrame: ## THE BODY HIDDEN return pandas.DataFrame( {"original sRNA": sRNAs["sRNAs"], "adapter removed": list(return_seqs)} )
Program 21:The function that is turned into a vector stripping app by Funix.
9Conclusion
In this paper, we introduce the philosophy and features of Funix. Funix is motivated by the observations in scientific computing that many apps are straightforward input-output processes and the apps are meant to be disposable at a large volume. Therefore, Funix’ goal is to enable developers, who are experts in their scientific domains but not in frontend development, to build apps by continue doing what they are doing, without code modification or learning anything new. To get this goal, Funix leverages the language features of the Python language, including docstrings and keywords, to automatically generate the GUIs for apps and control the behaviors of the app. Funix tries to minimize reinventing the wheel by being a transcompiler between the Python word and the React world. Not only does it expose developers to the limitless resources in the frontend world, but it also minimizes the learning curve. Funix is still a very early-stage project. As an open-source project, we welcome feedback and contributions from the community.
Funix is not the first to exploit variable types for automatical UI generation. Python Fire by Google is a Python library that automatically generates command line interfaces (CLIs) from the signatures of Python functions. Funix extends the idea from CLI to GUIs. interact in ipywidgets infers types from default values of keyword arguments and picks widgets accordingly. But it only supports five types/widgets (bool, str, int, float, and Dropdown menus) and is not easy to expand the support. We’d like to thank the developers of these projects for their inspiration.
Copyright © 2024 Bao et al. This is an open-access article distributed under the terms of the Creative Commons Attribution 4.0 International license, which enables reusers to distribute, remix, adapt, and build upon the material in any medium or format, so long as attribution is given to the creators.
- AI
- artificial intelligence
- CLI
- command line interface
- DSL
- Domain Specific Language
- GenAI
- generative artificial intelligence
- GUI
- graphical user interface
- LLM
- large language model
- ML
- machine learning
- MUI
- Material UI (User Interface)
